 Sonora
Documentation
Everything to install, configure and master Sonora — in a few minutes.
Overview
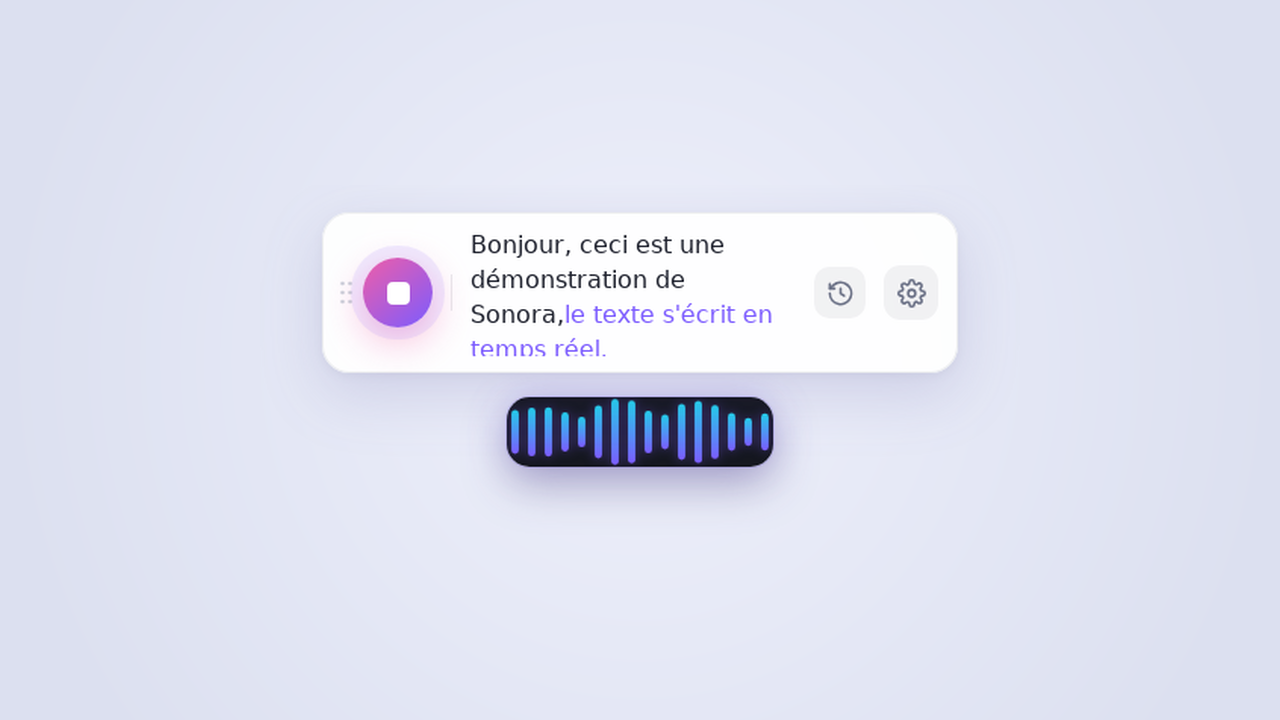
Sonora is a floating voice-dictation bar for macOS, Windows and Linux. You press a shortcut, you speak, and the transcribed text is typed straight at your cursor (or copied to the clipboard).
Sonora doesn't transcribe by itself: it relies on the engine of your choice. Depending on your priorities (speed, quality, privacy, cost), plug in Gemini, Mistral, OpenAI, Groq, any OpenAI-compatible service, or a fully local Whisper model that works without a connection.
Installation
Grab the latest version from the GitHub Releases page, then follow the steps for your system.
🍎 macOS (Apple Silicon & Intel)
- Download the
.dmg:…_aarch64.dmg(Apple Silicon) or…_x64.dmg(Intel). - Open the
.dmgand drag Sonora intoApplications. - On first launch, macOS may say "unidentified developer" (the app isn't notarized by Apple yet). Right-click → Open, then confirm.
- Grant microphone access (and Accessibility for type-at-cursor) when macOS asks.
xattr -dr com.apple.quarantine /Applications/Sonora.app🪟 Windows
- Download the
Sonora_x.y.z_x64-setup.exeinstaller (or the.msi). - Run it. SmartScreen may warn about an unknown publisher: More info → Run anyway.
- Follow the wizard, then launch Sonora from the Start menu.
🐧 Linux
AppImage (universal):
chmod +x Sonora_x.y.z_amd64.AppImage
./Sonora_x.y.z_amd64.AppImage
Debian / Ubuntu (.deb):
sudo apt install ./Sonora_x.y.z_amd64.debNixOS — native package via the flake (recommended on NixOS over the AppImage):
nix run github:Devitek/sonora      # run directly
nix profile install github:Devitek/sonora # install (menu entry + icon)wtype
(Wayland) or xdotool (X11). Install the one matching your session:
# Wayland
sudo apt install wtype
# X11
sudo apt install xdotoolFirst launch
On startup, Sonora shows a short onboarding then its floating bar. An icon also appears in the notification area (tray) to show/hide the bar and quit the app.
- Open the Settings (⚙ icon on the bar, or the Settings tab of the window).
- Choose a transcription provider.
- Paste the matching API key (see below).
- Close settings, press the mic button (or the shortcut) and dictate a sentence.
Choose an engine
Each engine has its strengths. Here's how to choose:
- Gemini Live — the only streaming option: text writes word by word as you speak. Ideal for long, fluid dictation.
- Mistral (Voxtral) — quality European transcription, per segment.
- OpenAI Whisper — the Whisper reference, per segment.
- Groq Whisper — Whisper
large-v3hosted on Groq: very fast. - OpenAI-compatible — point to any compatible endpoint (local server, other provider…) via a base URL.
- Local Whisper — 100% offline, no key, no data sent. See the dedicated section.
Get an API key
Create a key at the chosen provider, then paste it into Settings. It is stored in your OS keychain.
| Provider | Where to create the key |
|---|---|
| Gemini | aistudio.google.com/apikey |
| Mistral | console.mistral.ai/api-keys |
| OpenAI | platform.openai.com/api-keys |
| Groq | console.groq.com/keys |
AIza…). An ephemeral token starting with AQ. is not a valid API key
for Sonora — the app will warn you if you paste one.
All settings
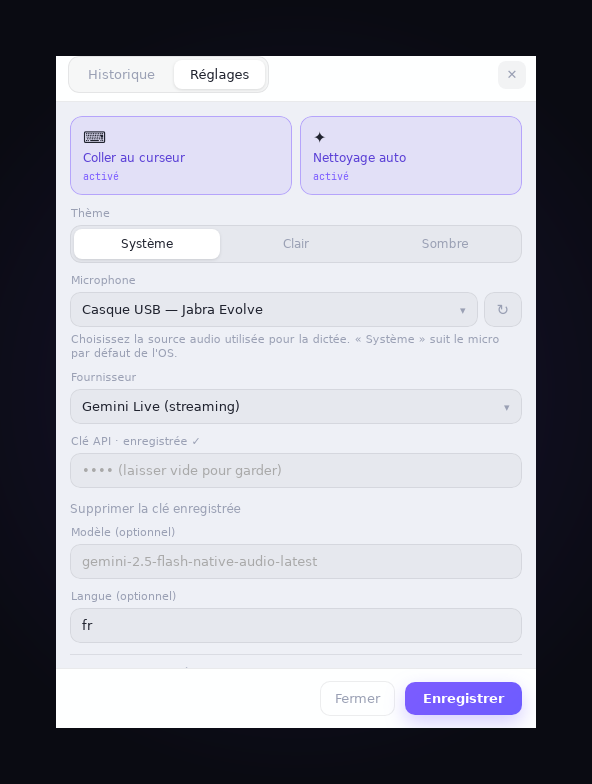
You'll find:
- Microphone — the audio source used for dictation. "System" follows the OS default mic; otherwise pick a specific device. The ↻ button refreshes the list (handy after plugging in a USB mic). An unplugged device automatically falls back to the default mic.
- Provider — the transcription engine.
- API key — stored in the keychain (see Privacy).
- Model (optional) — to override the default model.
- Language (optional) — a language hint (e.g.
fr) for Whisper engines. - Base URL (optional) — for OpenAI-compatible endpoints.
- ggml model path — for local Whisper.
- Automatic cleanup — enables the reformulation pass, with its own engine, model and prompts.
Useful defaults (only overridden if you fill a field):
| Provider | Default model | Base URL |
|---|---|---|
| Gemini Live | gemini-2.5-flash-native-audio-latest | — |
| Mistral | voxtral-mini-latest | https://api.mistral.ai/v1 |
| OpenAI | Whisper | https://api.openai.com/v1 |
| Groq | whisper-large-v3 | https://api.groq.com/openai/v1 |
| Cleanup (Gemini) | gemini-2.5-flash | — |
| Cleanup (OpenAI) | gpt-4o-mini | https://api.openai.com/v1 |
Local Whisper (offline)
The local Whisper engine transcribes on your machine, with no connection and no key.
It needs a ggml model file.
-
Download a
ggmlmodel from huggingface.co/ggerganov/whisper.cpp. For exampleggml-base.bin(light) orggml-large-v3.bin(more accurate, heavier). - In Settings, choose Local Whisper.
- Set the ggml model path to the downloaded file.
base or
small, move up if needed.
Dictate day-to-day
- Place your cursor where the text should appear (editor, field, chat…).
- Trigger dictation: the bar's mic button, or the global shortcut.
- Speak. The waveform follows your voice; with Gemini Live, the text writes live.
- Stop: the text is typed at the cursor or copied to the clipboard.
Cleanup & reformulation
Enable automatic cleanup so an LLM removes hesitations ("uh"), false starts and repetitions after each dictation.
Go further with custom reformulation prompts: define your own transformations and apply them to a dictation in one click. A few ideas:
- "Rewrite formally / professionally"
- "Convert to a terminal command"
- "Fix spelling and grammar only"
- "Summarize in one sentence"
Choose the reformulation engine (Gemini, Mistral, Groq, OpenAI or OpenAI-compatible) independently of the transcription engine.
History
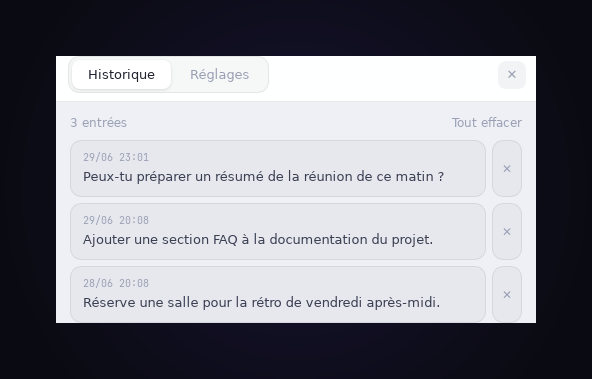
Sonora keeps your recent dictations. Open the history (clock icon on the bar) to re-read a past session and re-copy it to the clipboard in one click.
Linux & Hyprland
Sonora is a transparent, decoration-less, focus-less window. Under a tiling
compositor like Hyprland, float it and bind the global shortcut. Syntax for recent Hyprland
versions (match: selector):
windowrule = float on,            match:title ^(Sonora)$
windowrule = move (monitor_w/2)-240 40, match:title ^(Sonora)$
windowrule = border_size 0,       match:title ^(Sonora)$
windowrule = no_shadow on,        match:title ^(Sonora)$
windowrule = rounding 0,          match:title ^(Sonora)$
windowrule = no_blur on,          match:title ^(Sonora)$
windowrule = pin on,              match:title ^(Sonora)$
windowrule = no_initial_focus on, match:title ^(Sonora)$

# Push-to-talk: launch a 2nd instance that forwards the action to the running one
bind = SUPER, V, exec, sonora togglesonora instance that forwards the action
(toggle, start, stop, show) to the already-open
instance ("single-instance" mechanism).
Privacy & security
- Keys in the keychain — your API keys are stored in the OS keyring (fallback to a local file with
0600permissions), never in plaintext on the interface. - You choose where your data goes — with a cloud engine, audio is sent to the selected provider. With local Whisper, nothing leaves your machine.
- Open source — the code is public and auditable under the MIT license.
Troubleshooting
Text isn't typed at the cursor (Linux)
Install wtype (Wayland) or xdotool (X11). Otherwise Sonora falls back to the clipboard — paste with Ctrl+V.
"Invalid API key" or no transcription
Check the selected provider and its key. For Gemini, the key must start with AIza (not AQ.). Also check your quota at the provider.
No sound / the waveform doesn't move
Grant microphone access: macOS → System Settings → Privacy & Security → Microphone; Windows → Settings → Privacy & security → Microphone → "Let desktop apps…". Also check the correct input device at the OS level.
"Type at cursor" types nothing on macOS
Automatic typing at the cursor synthesizes keystrokes, which requires the Accessibility permission: System Settings → Privacy & Security → Accessibility, then enable Sonora. macOS doesn't always show the prompt — add the app manually and relaunch it.
macOS: "unidentified developer"
Right-click → Open on the app, or clear the quarantine: xattr -dr com.apple.quarantine /Applications/Sonora.app.
The UI looks blurry or offset (Wayland)
Sonora forces XWayland to work around a WebKitGTK fractional-scaling bug. If the display is still off under fractional scaling (e.g. 1.33), try an integer scale on that monitor.
Crash on launch on Linux: EGL_BAD_PARAMETER
If the app exits immediately with Could not create default EGL display: EGL_BAD_PARAMETER. Aborting…
(common in VMs, on NixOS, or on recent Intel Arc/Xe GPUs), it's WebKitGTK's DMABUF renderer.
Sonora disables it automatically since v0.2.4. On an earlier version, run with:
WEBKIT_DISABLE_DMABUF_RENDERER=1 ./Sonora_x.y.z_amd64.AppImageappimage-run via
bubblewrap, Mesa drivers in /nix/store). The simplest and most reliable path is the
native Nix package — nix run github:Devitek/sonora — which uses the
system WebKitGTK and drivers (see also Build from source).
If you insist on the AppImage, the full combo (GPU compositing off, WebKit sandbox off) is:
nix-shell -p appimage-run --run \
  "WEBKIT_DISABLE_DMABUF_RENDERER=1 \
   WEBKIT_DISABLE_COMPOSITING_MODE=1 \
   WEBKIT_DISABLE_SANDBOX_THIS_IS_DANGEROUS=1 \
   appimage-run ./Sonora_x.y.z_amd64.AppImage"
Settings / key lost after an update
Settings are tied to the app identifier. After a major update that changes that identifier, re-enter your key once.
Build from source
Prerequisites: Rust (stable), Bun, and the Tauri system dependencies (WebKitGTK, etc.).
git clone https://github.com/Devitek/sonora.git
cd sonora
bun install
bun run tauri dev      # development
bun run tauri build    # production build
NixOS / Nix — the flake exposes a native package, the recommended way on NixOS (over the AppImage, which trips on EGL/bubblewrap drivers):
nix run github:Devitek/sonora      # run directly
nix build github:Devitek/sonora    # -> ./result/bin/sonora
For development, the flake also provides a full devshell:
nix develop
bun install
bun run tauri dev                    # or: bun run tauri build
A question, a bug, an idea?
Open an issue or explore the code on GitHub.